If you’ve ever printed a complex model and found it failed halfway through, this guide is for you. Failures often occur due to overhangs or bridges.
Supports are often the secret sauce behind successful FDM prints. In this post, we’ll cover everything you need to know. We will discuss types and settings. We will also give removal tips and explore personal use cases.
🔍 What Are Supports in FDM Printing?
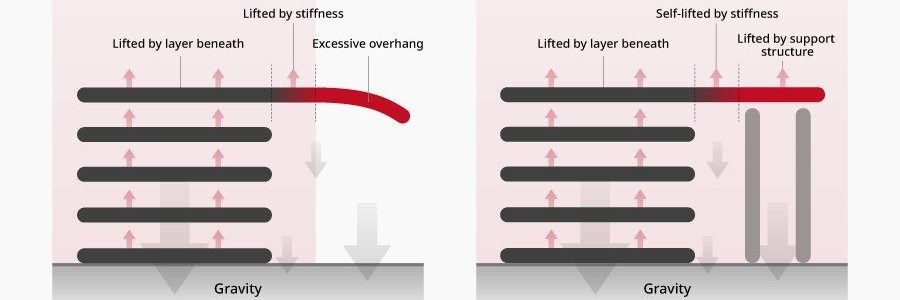
In Fused Deposition Modeling (FDM), printing happens layer by layer. The hotend extrudes molten thermoplastic onto a build plate. It traces the cross-sectional geometry of the model. Once that layer cools slightly, the nozzle moves up (typically by 0.1–0.3 mm) and deposits the next layer on top.

🔬 At a microscopic level, each filament strand bonds to the layer beneath by thermal adhesion. The heat slightly remelts the surface below. This fuses the new layer with the earlier one. This “layer stacking” process works well only if each new layer has solid support beneath it.
If a part of the model is hanging in mid-air, such as an outstretched arm, the molten filament has nothing to adhere to. The filament cannot attach to anything. Gravity takes over. That’s when supports become essential.
Supports are like scaffolding in a building—they give structure during printing and are removed afterward. In this guide, we’ll explore how to configure them effectively, which types work best, and how to remove them cleanly. You’ll also get presets, real-life examples, and tips from my own workshop.
🛠️ Types of Supports
1. Grid / Zigzag
- Best for: General use, strong support.
- Pros: Great stability.
- Cons: Harder to remove, can damage surface.
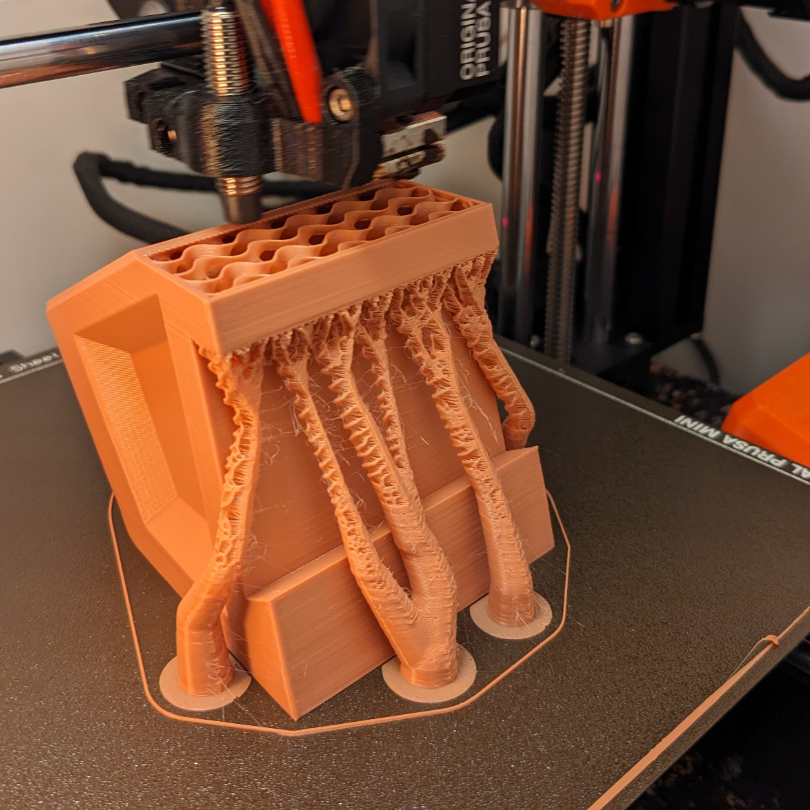
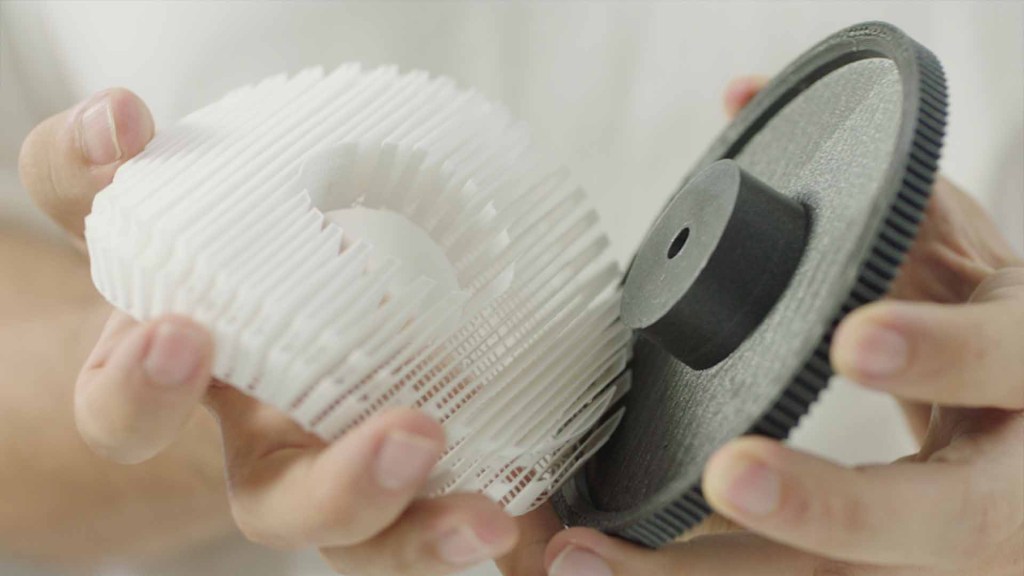
2. Tree / Organic
- Best for: Curved or organic shapes.
- Pros: Less material, easier to remove, great surface finish.
- Cons: Sometimes less stable during tall prints.
Check bambu studio full support settings
⚙️ Key Support Settings in Your Slicer
Whether you use Cura, PrusaSlicer or Bambu Studio, here are the settings that matter:
- Support Overhang Angle: Lower value = more supports. Try 50° to start.
- Support Density: 10–20% is enough for most prints.
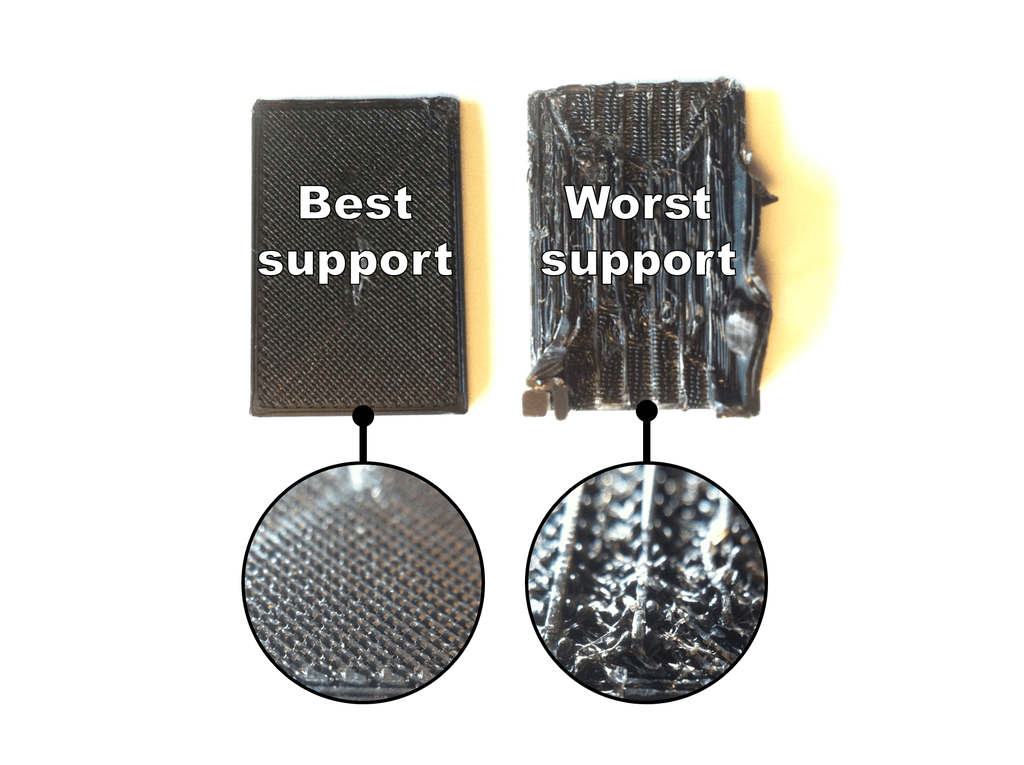
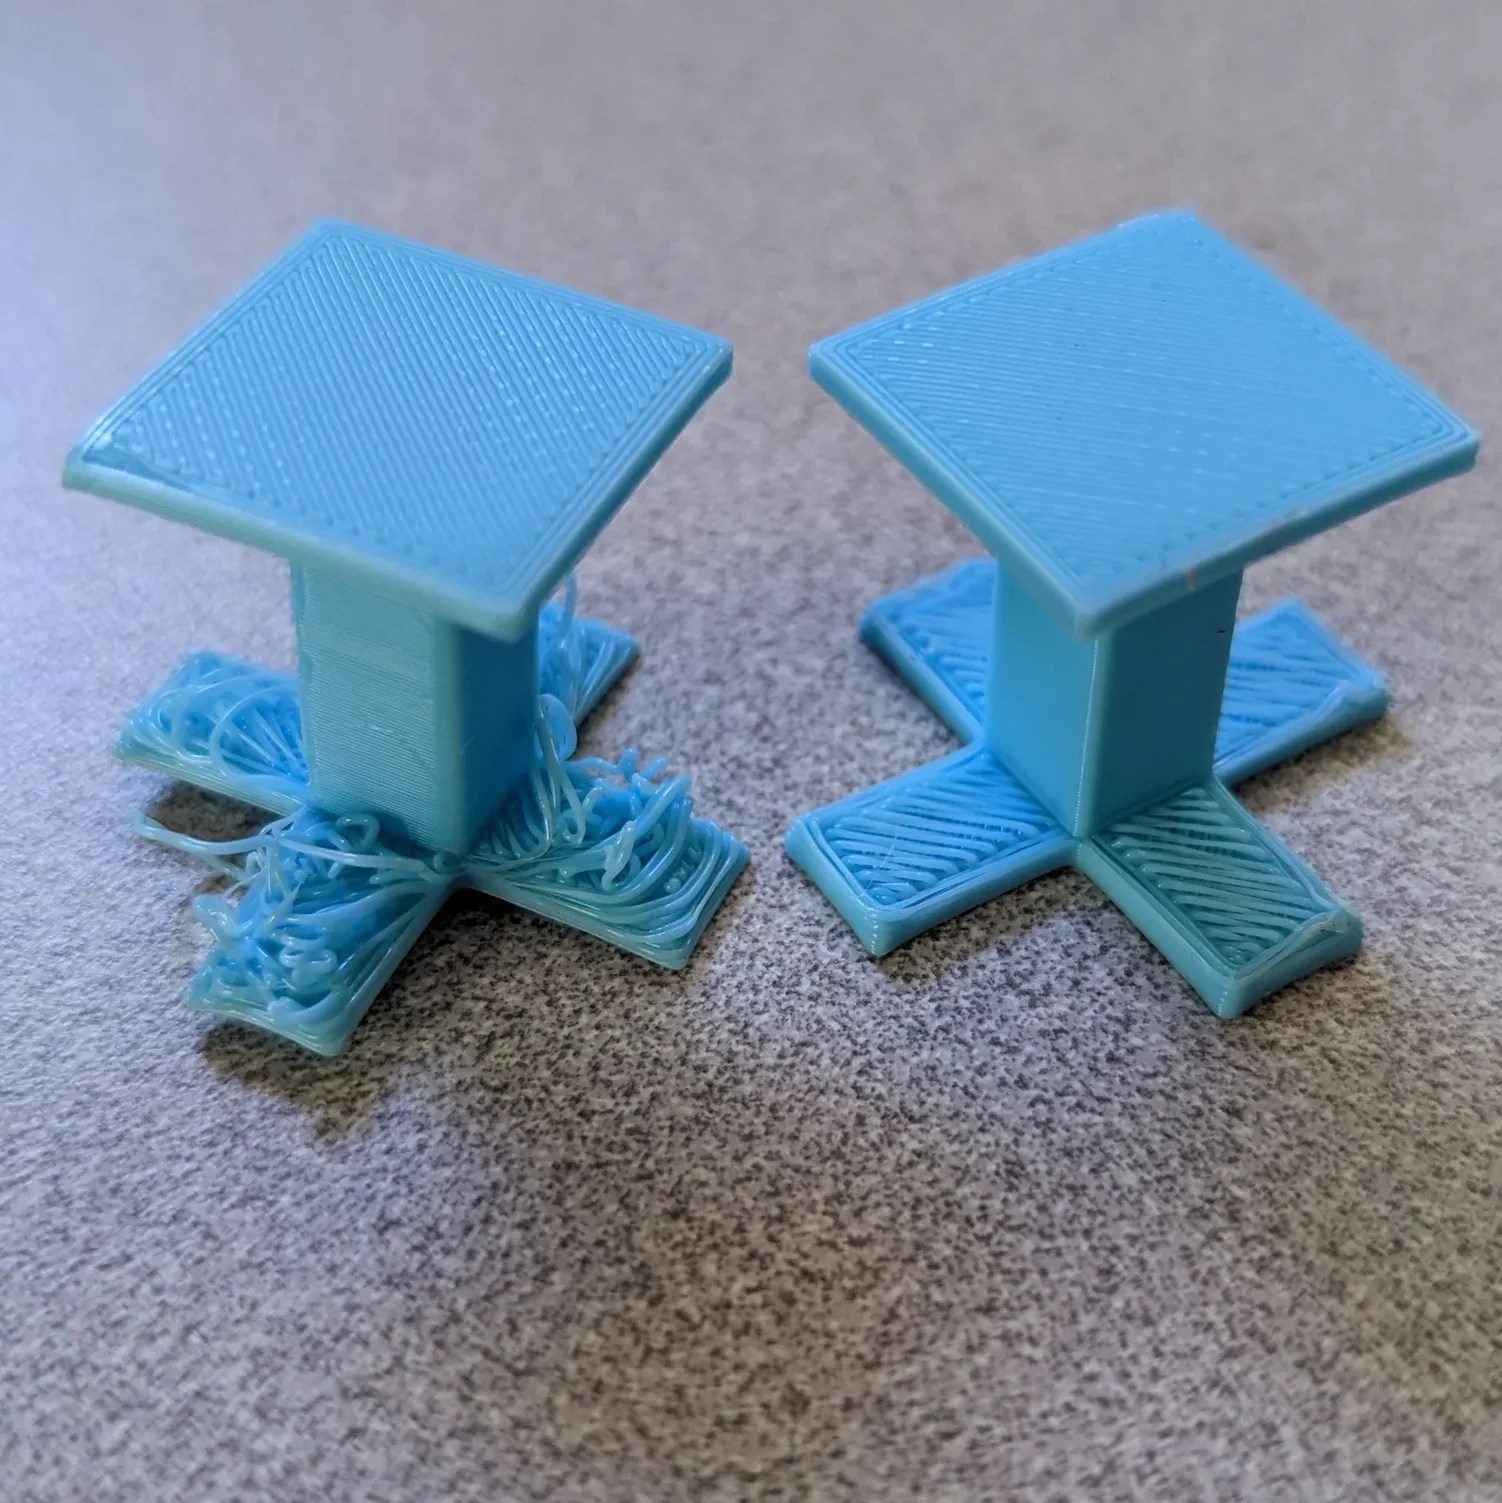
- Z Distance (or Air Gap): Controls ease of removal. Too close = stuck supports. Too far = poor quality.
- Support Interface: A smoother layer between support and model.
💡 Tip: Start with a default profile and tweak from there. I often use tree supports with 15% density and 0.2 mm Z-distance for detailed minis.
📦 Presets You Can Try
- Download Cura preset for miniatures with tree supports →
- Download PrusaSlicer preset for mechanical parts with grid →
🧪 Real-World Use Cases
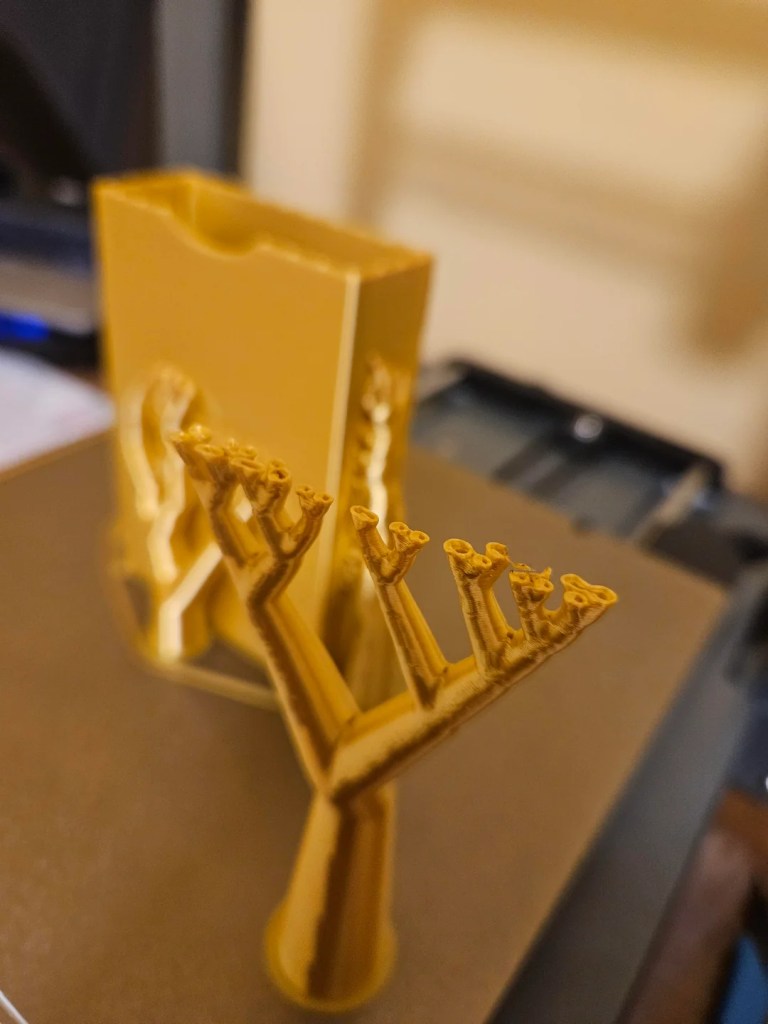
- Miniatures with extended arms: Tree supports reduce damage to surface details.
- Functional brackets: Grid supports offer needed rigidity.
- Benchy on a slope? You’ll want a mix of both, plus a raft.
✂️ Support Removal Tips
- Wait for the print to cool down — Supports peel off easier.
- Use needle-nose pliers and a deburring tool.
- For tight spots: Try warm water or a heat gun on low setting.
- Post-processing: Light sanding or a soldering iron for smoothing.
💡 Personal tip: I always keep a toothbrush-sized wire brush handy for leftover strings. I also keep a flush cutter for precise cuts.
❓ FAQs
1. Do I always need to use supports?
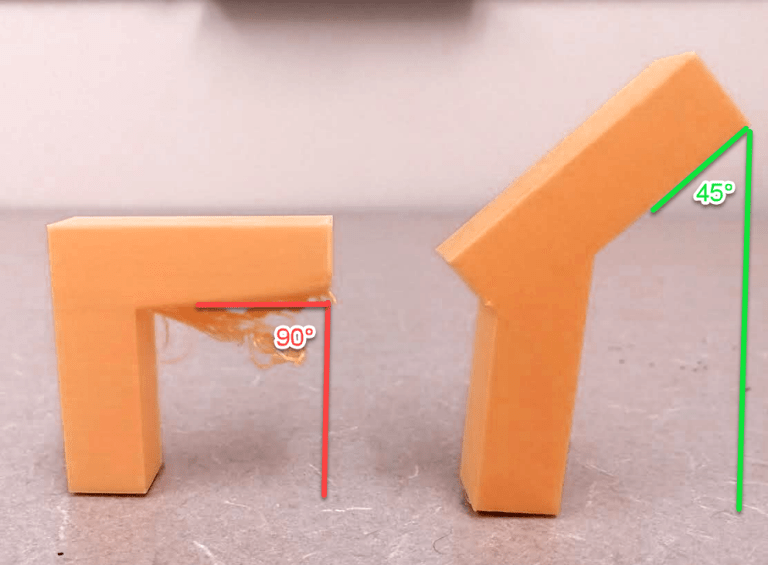
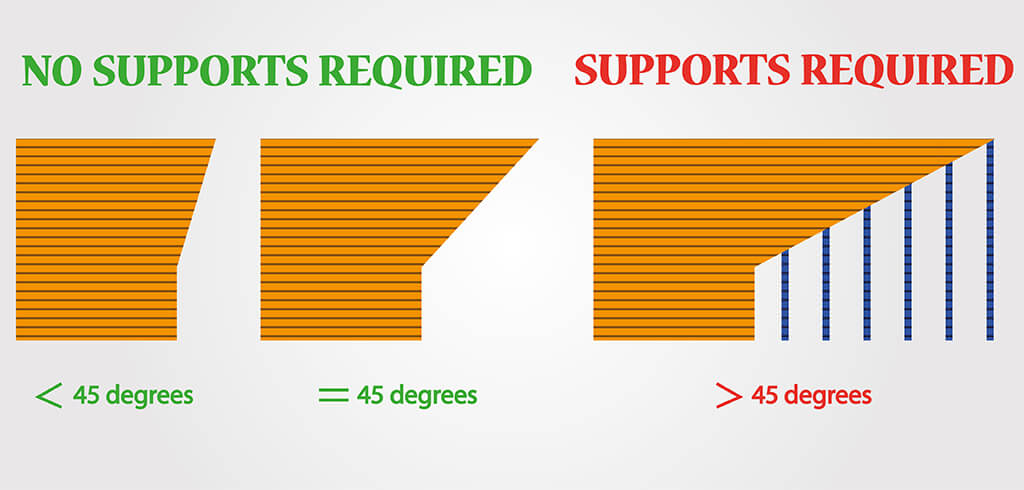
Not always. Supports are necessary in several cases. These include when your model has overhangs greater than 45°. They are also needed for bridges that span long distances or for complex geometries like arches or floating limbs.

If your model is mostly vertical, you get away without supports. Models with built-in angles also not need supports. This approach is called designing for FDM.
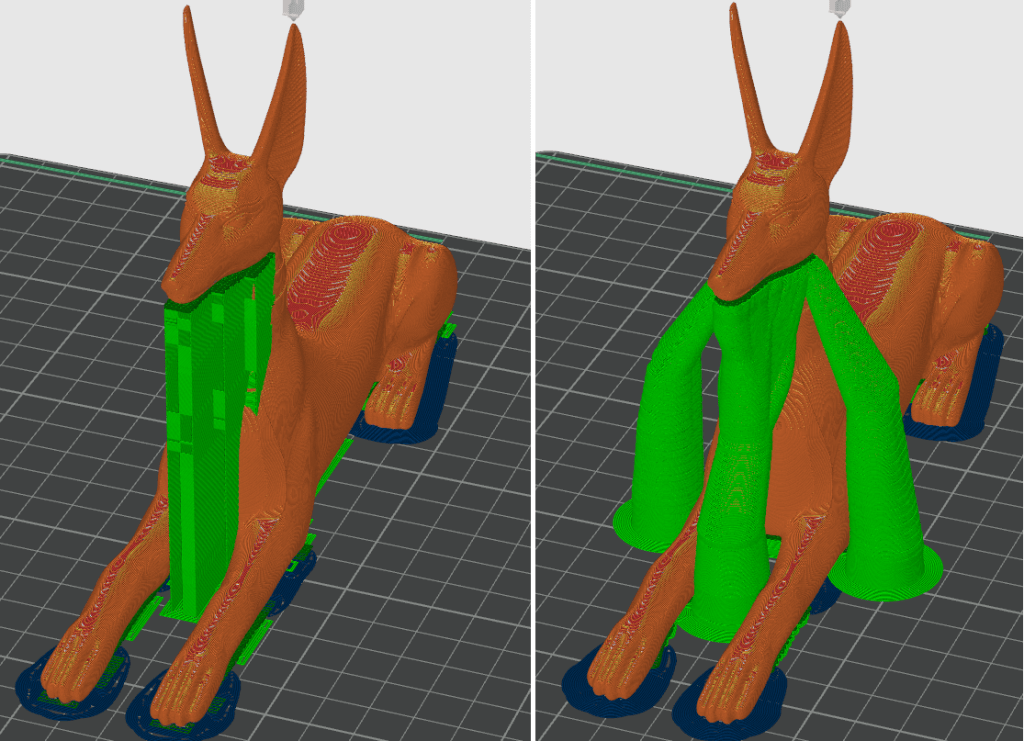
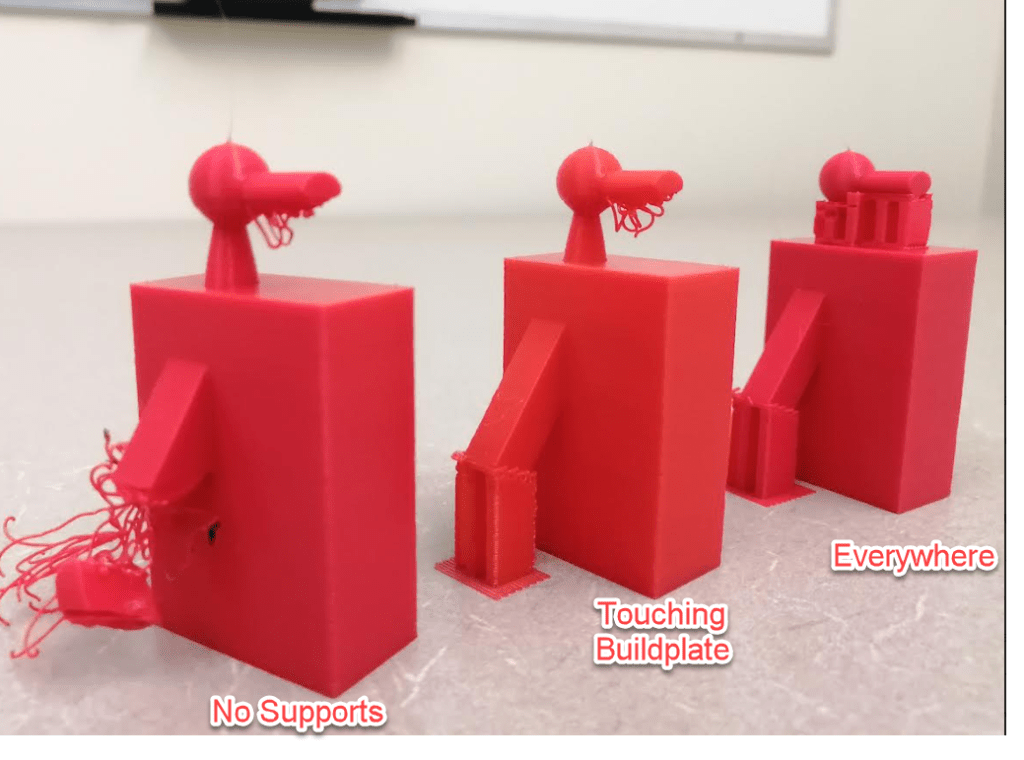
2. What’s the difference between “touching build plate” and “everywhere”?
- Touching Build Plate: Supports are only generated where overhangs start from the bed. Great for minimal support waste and easier removal.
- Everywhere: Supports will be created under any overhang, even those floating mid-air above other parts. Useful for detailed prints but can be harder to remove and leave marks.

Use “Everywhere” when printing miniatures or articulated models. For simpler models, “Touching Build Plate” often does the trick.
3. What’s the easiest support structure to remove?
Tree supports (in Cura and PrusaSlicer) are generally easier to remove and leave fewer surface blemishes. They grow like organic branches, minimizing contact with the print.
Grid supports are stronger and more stable but can be difficult to remove cleanly, especially in tight spaces.
4. Why are my supports fusing to the model?
Causes:
- Support Z Distance too low (or 0). Try 0.2–0.3 mm depending on nozzle size.
- Too high print temperature, making supports too sticky.
- Poor cooling. Make sure your fan settings are optimized.
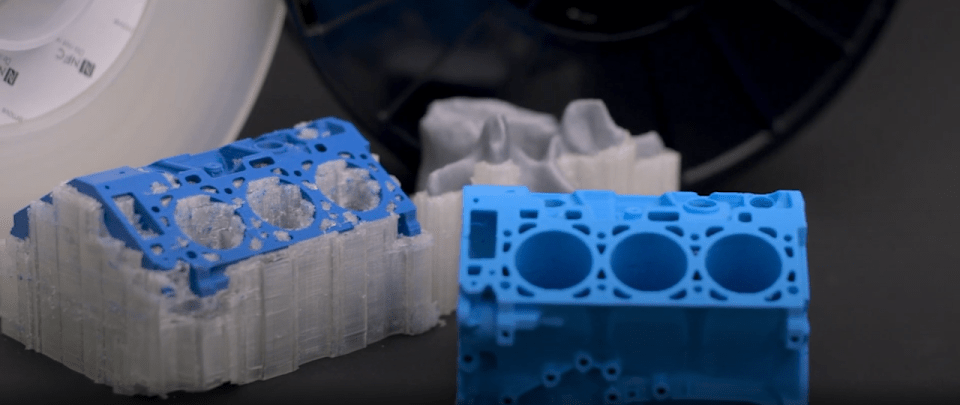
5. Can I print with a different material for supports?
Yes—if your printer has dual extrusion. For example:
- PLA model + PVA (water-soluble) supports = effortless removal.
- PETG model + HIPS supports (removable with limonene).
Ideal for complex designs, though it requires proper slicer setup and dry storage of filaments.
6. How can I make supports easier to remove?
- Use “Support Interface” in your slicer for smoother detachment.
- Increase Z Distance slightly.
- Lower support density (10–15% often works).
- Use Support Blockers to protect key surfaces.
7. Why does the underside of my print look ugly after removing supports?
This is called support scarring or support artifacts. It happens because supports create uneven cooling and leave imprints.
Tips to reduce it:
- Use Support Interface layers.
- Orient the model to hide critical details.
- Sand or post-process with heat gun or primer.
8. Can I save time and material by customizing where supports go?
Absolutely. Most slicers like Cura, PrusaSlicer or Bambu Studio allow you to:
- Block supports from areas.
- Manually add supports only where needed (using Paint-on supports or support enforcers).
This lets you balance print quality and material efficiency.
[Insert screen capture of custom support painting in slicer]
9. Should I print supports with the same settings as the model?
No. You can (and should) adjust support-specific settings:
- Lower infill
- Thicker layers
- Faster speed
This speeds up print time and uses less filament.
10. What’s your personal rule of thumb for supports?
“Design smart, support light.”
I go for it if I can tweak the model to avoid supports. This includes adding chamfers, bridging-friendly angles, or slicing it into printable parts.
Supports are necessary sometimes. I prefer tree supports + interface layers. I also use “touching build plate” unless the print truly requires full coverage.
💬 Let’s Talk Printing
Have a favorite slicer setting combo? A disaster support story?
Drop it in the comments—your tip can save someone a ruined print.

Leave a comment