3D printing can be incredibly rewarding—but also frustrating when prints go wrong. In this comprehensive guide, we break down the most frequent 3D printing issues. We explain how to recognize them visually. We also offer step-by-step solutions to prevent them in the future. Perfect for beginners and intermediate users alike.
1. Layer Shifting
What it is: Layers have slid sideways, misaligning the model.
Common Causes:
- Loose belts or pulleys
- Stepper motor skipping due to lack of current or overheating
- Sudden jerky movements or crashes
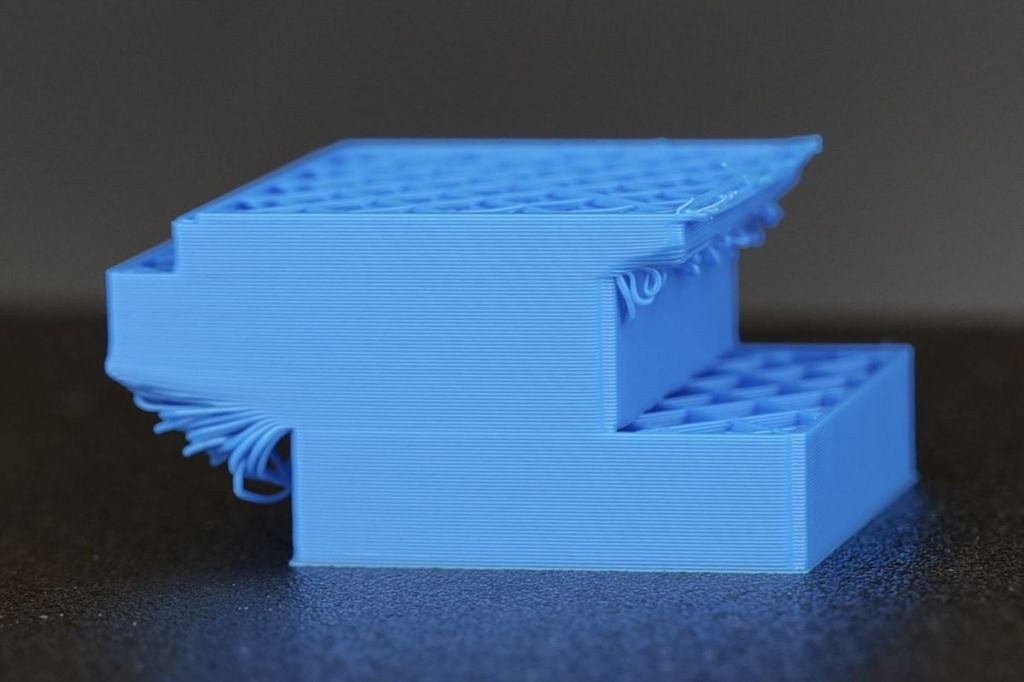
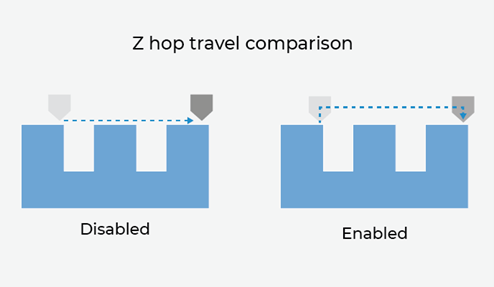
- Print head colliding with the object due to improper Z-hop or layer height settings
How to Avoid It:
- Check belts tension and tighten if needed
- Make sure stepper drivers are properly cooled and calibrated
- Use Z-hop (Z-lift) carefully during retraction to prevent nozzle crashes
- Slow down print speed for tall or narrow models
🛠️ Pro Tip – From Experience:
“I once had persistent layer shifts and couldn’t figure out why. It turns out that the Z-hop (Z-lift) setting was too low on that particular printer. The nozzle kept bumping into already-printed parts during travel moves. Every time it collided, it nudged the whole model, causing subtle but consistent shifts. After increasing the Z-lift and tweaking retraction settings, it stopped completely. So always test and tune Z-hop per printer model — it’s not one-size-fits-all!”
[Link: Z Hop: What Is It & How to set up in Cura]
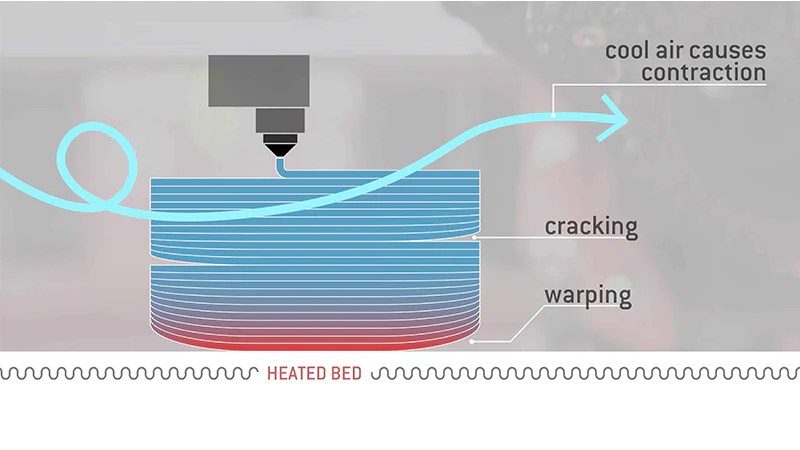
2. Warping
What It Is:
Warping happens when the corners or edges of a print lift off the build plate during printing. It’s usually caused by uneven cooling, poor bed adhesion, or material shrinkage. This can ruin dimensional accuracy or even cause total print failure.
Common Causes:
- Poor bed adhesion
- Cold ambient air or drafts
- Incorrect first layer settings
- Materials with high shrinkage (like ABS or Nylon)
How to Avoid It:
- Level your bed and clean it properly
- Use a heated bed with the right temperature for the filament
- Print in an enclosed or warm environment
- Use adhesion helpers like glue stick, hairspray, or textured sheets
My Go-To Solution: Brims
After many frustrating failed prints, I’ve found that when nothing else works, a brim is what saves the job. A brim adds a flat layer around the model’s base, increasing contact with the bed and improving adhesion dramatically.
There’s been countless times when even with ideal leveling and temperature, my prints—especially large ones—kept lifting. In those cases, turning on a 10 mm brim made the difference between a failed and a successful print.
🧠 Brim Configuration Tips:
- Brim Width: Set between 5–10 mm for most models; more for large or complex prints.
- Minimum Brim Line Count: Try starting with 8–12 lines for strong hold.
- Z Seam Consideration: Align your Z seam away from critical corners to make brim removal cleaner.
- Model Overhang Clearance: Avoid placing brims under delicate details or sharp overhangs that might break off during removal.
🧼 Easy Removal Trick:
To make the brim easier to peel off without losing adhesion:
- Reduce initial layer line width slightly (e.g., from 120% to 105%).
- Enable a small gap between brim and model (e.g., 0.1 mm), if your slicer allows it — Cura calls this “Brim Distance”.
- After the print finishes, let it fully cool: a cold print often releases the brim cleaner than when still warm.
Pro Tip:
Let your print cool completely before removing it. I’ve noticed that cooled brims peel off cleaner and with less chance of damaging the part. Also, reducing the initial layer line width slightly (e.g., from 120% to 105%) can help the brim release without compromising its role.
🕸️ Stringing (a.k.a. “Hairy Prints”)
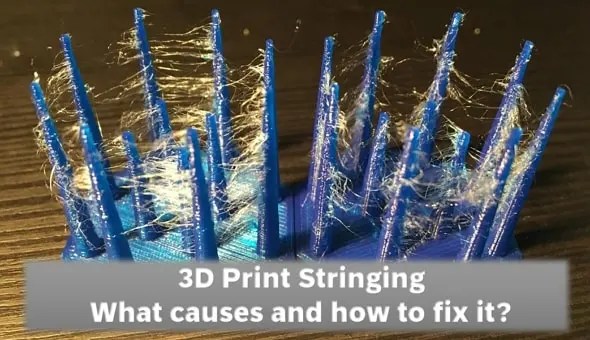
What It Is:
Your nozzle leaks small strands of plastic. This occurs while moving between different parts of the print. This leakage causes stringing.
This is by far one of the most common issues in 3D printing. Honestly, it is one of the most annoying to fine-tune.
Why It’s So Persistent:
Unlike more mechanical problems, stringing requires lots of trial and error. What works for one filament, printer, or even environment not work for another.
After printing for a few years, I’ve learned the hard way:
Changing your filament brand means you have to re-test everything. Switching material types, like going from PLA to PETG, also requires re-testing. Even a change in nozzle diameter needs another test.
What used to be perfect retraction settings for your old 0.4 mm PLA setup will cause major stringing when you swap to a 0.6 mm PETG filament. And yep—you’ll need to go back to the drawing board.
🧪 Benchmarking Models to the Rescue
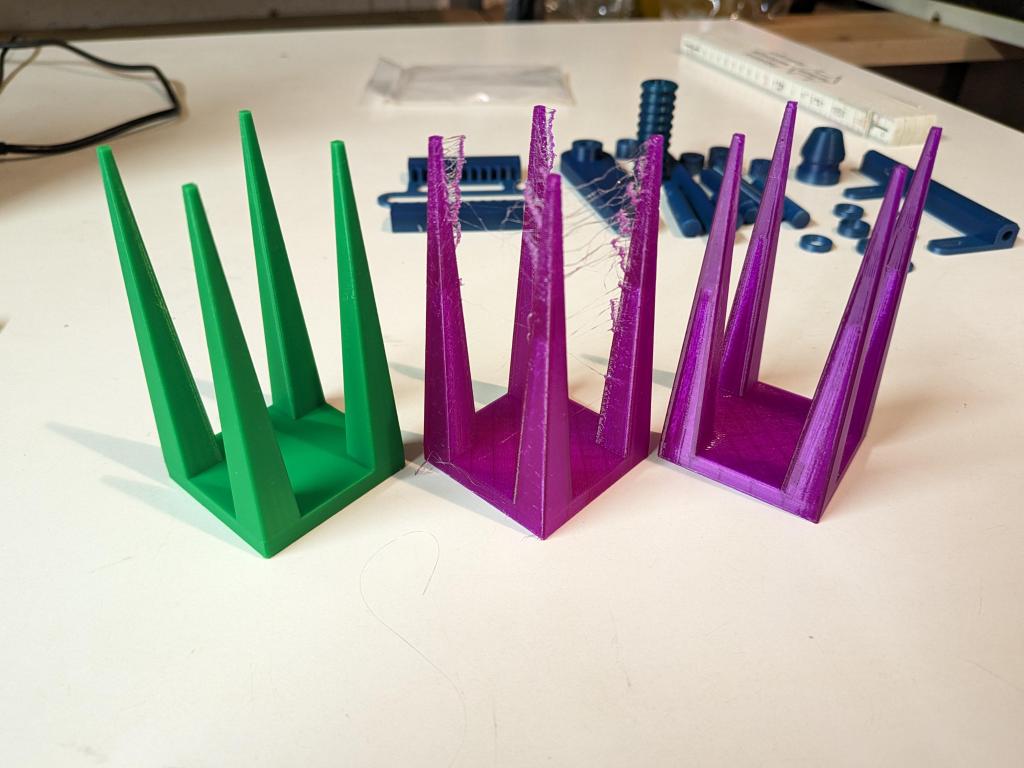
One thing that helps is using stringing benchmark models. These are simple test files designed specifically to find the best settings for your current filament and hardware.
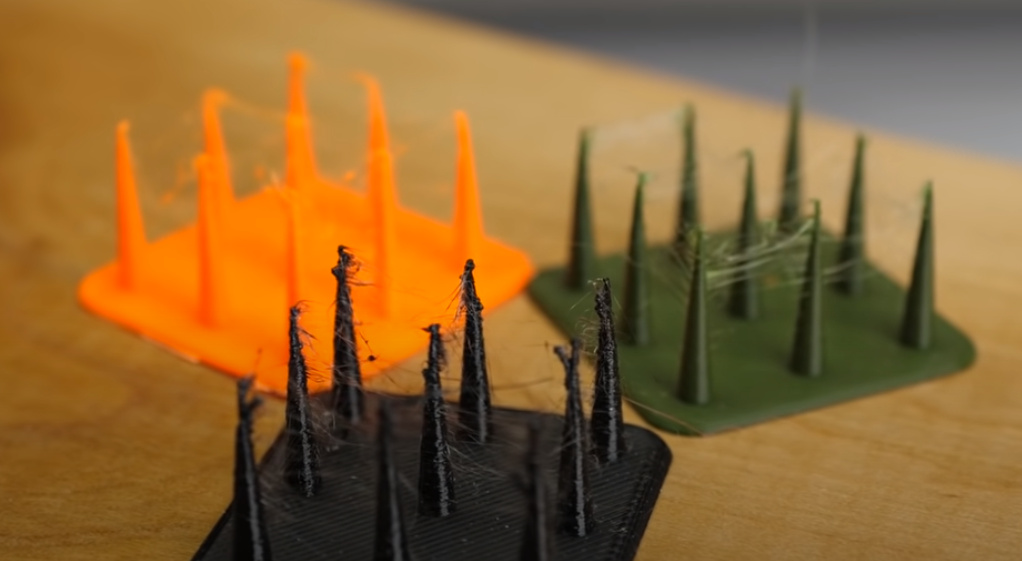
These models usually have columns or towers spaced apart, forcing your printer to move and retract often. That’s exactly where stringing tends to.
Some benchmarks you can download for free and test by your own:
https://www.thingiverse.com/thing:3601364
https://www.thingiverse.com/thing:3039763
https://www.thingiverse.com/thing:33698
🔗 [Coming Soon: Full Guide to 3D Printing Benchmark Tests]
🔧 Common Solutions for Stringing
1. Retraction Settings
- Increase retraction distance gradually
(e.g., from 3 mm to 5 mm on a Bowden setup) - Increase retraction speed
(30–45 mm/s is a safe range)
2. Temperature Tweaks
- Try lowering your printing temperature by 5–10°C
Higher temps make the filament ooze more
3. Travel Settings
- Enable Combing Mode (in Cura) or equivalent in other slicers
It keeps nozzle moves within printed areas to avoid crossing gaps - Activate Avoid Crossing Perimeters
4. Wipe & Coasting
- Enable Wipe to retract slightly while moving
- Use Coasting to stop extrusion just before the travel move
5. Dry Your Filament
- Moisture causes excessive stringing, especially in PETG, Nylon, or flexible filaments
Use a filament dryer or oven to dry at ~50°C for a few hours
🧠 My Experience: Start Simple
When I change materials, the first thing I print is a stringing benchmark model. Even if the filament says “low stringing” on the box, I don’t trust it.
And honestly, some brands just string more than others. I’ve had some cheaper spools that never stopped stringing, no matter the settings. In contrast, others, like premium PLA or dry PETG, performed way better even with minimal tweaking.
So my advice:
Start with retraction + temperature, run a quick benchmark, then refine with travel and wipe settings.
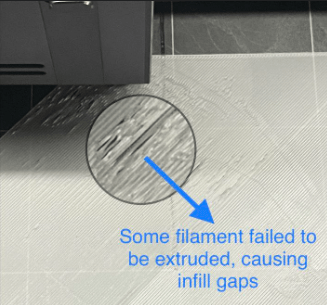
3. Under-Extrusion (Not Enough Filament Coming Out)
What It Is:
Under-extrusion occurs when the printer doesn’t deliver enough filament during printing. You’ll notice gaps, weak layers, brittle walls, or areas that look not fully filled and fragile.

🧠 Why It Happens: Common Causes
1. Clogged or Partially Blocked Nozzle
Dust, degraded filament, or heat creep can lead to small obstructions.
2. Incorrect Filament Diameter Setting
If the slicer is expecting 2.85 mm but you’re using 1.75 mm (or vice versa), you’ll get poor flow.
3. Low Flow Rate / Extrusion Multiplier
A common slicer setup error. Some filaments—like matte PLA—need higher flow rates.
4. Worn or Dirty Drive Gear (Hobbed Bolt)
The hobbed gear can “bite” into the filament. It can grind it down if the tension is off. It can also happen if it’s clogged with debris. Once it chews into the filament, it loses grip and extrusion stalls.

5. Over-Tightened or Loose Feeder Tension
Too tight, and it shreds the filament. Too loose, and it slips. Sometimes, the hobbed just needs replacement.
6. Overcooling
If your part cooling fan is too aggressive—especially near the hotend—it can drop the nozzle temperature locally. This can solidify the filament before it’s fully extruded.
7. Printing Too Fast
At high speeds, filament doesn’t have time to fully melt before exiting the nozzle. This issue is more common with thicker layers or tougher materials.
8. Wet or Poor-Quality Filament
Moist filament can cause popping, bubbling, and irregular flow.
9. Hotend Path Issues
A Bowden tube that’s not seated properly can create a gap. This gap leads to backpressure or extrusion resistance.
🔍 Personal Experience
I’ve seen under-extrusion cause me hours of confusion. One time, the issue was the hobbed gear tension—too tight, and it shaved the filament instead of pushing it. Another time, switching to a cheaper PLA caused under-extrusion until I increased the nozzle temp and flow rate.
From experience: under-extrusion is rarely caused by a single factor. It’s often a mix of minor features—like a slicer setting, plus a speed that’s just a little too fast.
✅ How to Fix It (Checklist)
✔️ Clean the Nozzle
Perform a cold pull or swap it out if needed.
✔️ Verify Filament Diameter & Flow
Set slicer diameter properly, and adjust flow rate 5–10%.
✔️ Inspect the Drive Gear
Check for grinding, dust, or misalignment. Clean and re-tension.
✔️ Adjust Printing Speed
Slow it down, especially for dense or detailed models.
✔️ Monitor Cooling Settings
Reduce fan speed near the nozzle if overcooling is suspected.
✔️ Dry Your Filament
Keep it in airtight containers with desiccants or dry before use.
🧪 Pro Tips
🔹 Use a consistent benchmarking routine
Calibration cubes and flow towers help narrow down the cause fast.
🔹 Try transparent filament when debugging
You can often see the filament path better and detect jams visually.
🔹 Adjust retraction settings carefully
Too much retraction can cause gaps at the beginning of lines.
🔹 Keep spares
Have spare PTFE tubes and nozzles ready—solves half of the issues quickly.
4. Elephant’s Foot – When the First Layer Spreads Too Much
What is it?
The “Elephant’s Foot” is a common printing defect. The bottom layer of your print bulges outward. It resembles a foot squashing under the weight of the object. It gets its name from this visual resemblance. This defect usually appears when the first layer is over-compressed or overheated. This causes it to spread out more than intended.
🔍 Why It Happens
- Build plate too close to the nozzle: Over-compression flattens the first layer unnaturally.
- Excessive bed temperature: Makes the plastic too soft and runny on initial layers.
- Lack of cooling on the first layers: Especially in PLA, this leads to overheating and spreading.
- Heavy prints: The weight of large models may also press down on soft bottom layers early in the print.
✅ How to Fix It

- Re-level your bed. Increase Z offset slightly. Give the first layer just enough squish to stick. Be careful not to flatten it like a pancake.
- Lower the bed temperature: For PLA, try dropping from 60 °C to 55 °C. You can even go to 50 °C if adhesion allows.
- Enable cooling fan after the first layer: Activating cooling earlier helps layers solidify and retain shape.
- Use chamfers in your 3D model: Add a 0.2–0.5 mm bevel to the bottom edges so any deformation is less visible.
- Adjust slicer “initial layer expansion” settings: Some slicers (like Cura) have options to shrink or compensate for first layer spread.
🔧 Pro Tips (from experience)
💡 “One of the easiest ways I’ve fixed Elephant’s Foot is just slightly increasing the initial Z-offset by 0.05–0.1 mm. You’d be amazed at how much difference that tiny adjustment can make.”
💡 “I also learned the hard way that when using materials like ABS or PETG, bed temps matter a lot. With PETG especially, even 5 degrees too hot and you’ll get major squish on your corners.”
💡 “Another trick I use for prints where dimensional accuracy on the base is critical: I design a 0.4 mm chamfer in Solidworks, so if the first layer does bulge, it doesn’t interfere with assembly or fit.”
⚙️ Slicer Settings to Check
| Setting | Recommendation |
|---|---|
| Initial Layer Height | 0.2 mm max (for most nozzles) |
| Z-Offset (Nozzle Distance) | Increase by 0.05–0.1 mm |
| Bed Temperature | Reduce by 5–10 °C |
| Cooling Fan | Start at layer 2–3 |
| Elephant Foot Compensation (Cura) | Try -0.2 mm |
Common Causes:
- Bed too close to nozzle
- Excess bed temperature
How to Prevent It:
- Re-level bed and adjust Z-offset
- Lower first-layer bed temperature
- Use initial layer fan cooling
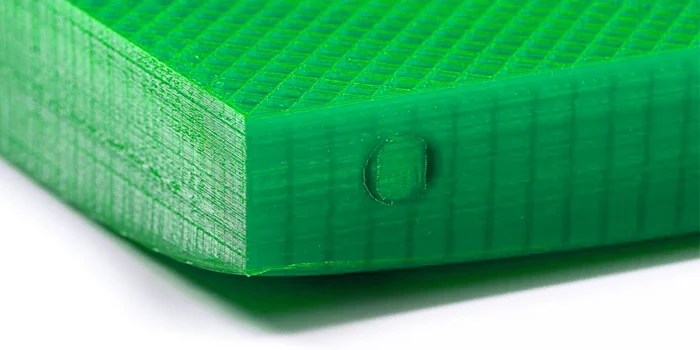
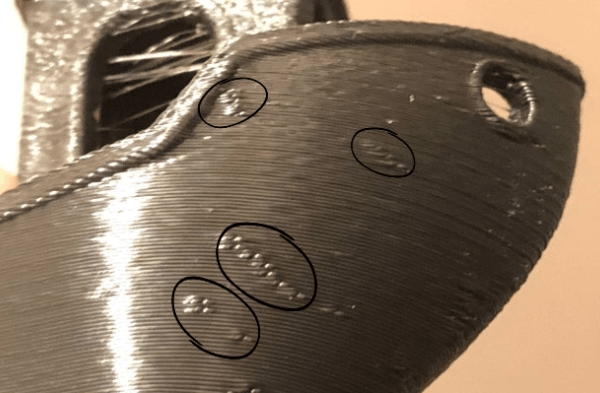
5. Blobs and Zits – Tiny Imperfections That Ruin a Smooth Surface
What are they?
Blobs are small bumps or excess filament deposited during layer changes or pauses. Zits are pinhead-like marks typically found along the seam line of your print, especially in cylindrical or curved objects.
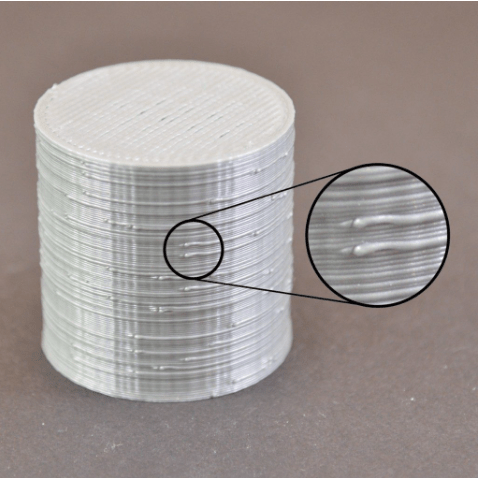
These defects seem minor, but they stand out on glossy finishes or when painting models. For functional parts, they can also interfere with fit or assembly.
🔍 Why They Happen
- Retraction settings setup: Insufficient retraction can leave pressure in the nozzle, causing extra oozing.
- Improper coasting settings: If coasting is too low (or off), the extruder continues pushing filament after movement ends.
- Inconsistent pressure in hotend: Pressure build-up and sudden releases during travel moves can cause blobs.
- Seam placement: Random or aligned seams can concentrate zits in visible areas.
- Start/stop gcode behavior: Some slicers push a small prime at the beginning of each line—creating visible zits.
✅ How to Fix It
- Tune Retraction: Increase retraction distance (start with 4–6 mm for Bowden, 1–3 mm for direct drive).
- Enable Coasting: This stops extrusion slightly before the end of a move to relieve pressure.
- Use “Wipe While Retracting”: Helps clean up the nozzle before a travel move.
- Optimize Seam Placement: Set to “Hide Seam”, “Rear”, or “Aligned” to position artifacts away from visible areas.
- Lower Print Temperature: Reduce 5–10 °C to minimize oozing—higher temps increase flow rate and can cause blobs.
- Print Slower: High-speed transitions exaggerate pressure build-up.
🔧 Pro Tips (from experience)
💡 “Blobs drove me crazy when I was printing vases and cosplay helmets. What finally helped was enabling ‘coasting’ in Cura and setting it to 0.2–0.4 mm³—instantly smoothed the seams.”
💡 “Another thing that made a difference: changing seam alignment to ‘random’ for organic shapes. I used a ‘user-specified location’ when printing functional parts. This allowed me to hide it in a corner.”
💡 “If you’re seeing zits exactly where each layer starts, look into your slicer’s ‘extra restart distance’ setting. In my case, it was adding 0.1 mm too much—it was meant to help under-extrusion, but made blobs worse.”
⚙️ Slicer Settings to Check
| Setting | Recommendation |
|---|---|
| Retraction Distance | 4–6 mm (Bowden), 1–3 mm (Direct Drive) |
| Retraction Speed | 25–50 mm/s |
| Coasting Distance (Cura) | 0.2–0.4 mm³ |
| Wipe While Retracting | Enabled |
| Z Seam Alignment | “Hide”, “Sharpest Corner”, or “User Specified” |
| Print Temperature | Reduce in 5–10 °C steps |
| Travel Speed | 150–200 mm/s (but test lower) |
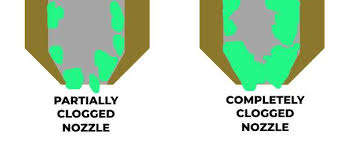
6. Clogged Nozzle
What is it?
A clogged nozzle occurs when molten filament can’t exit the hotend properly due to a partial or total blockage. It results in under-extrusion, layer gaps, or a total halt in extrusion.
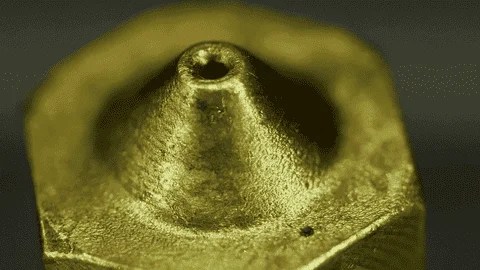
This is one of the most frustrating issues, especially mid-print. But with the right knowledge (and patience), it’s totally fixable.

🔍 Why It Happens
- Low-quality or old filament: Moisture or dust in the filament causes degradation and carbon buildup inside the nozzle.
- Printing too cold: Material doesn’t melt properly. It clogs the tiny orifice, especially with tough filaments like PETG or filled materials.
- PTFE tube gap: In setups with Bowden or PTFE-lined hotends, even a tiny gap between the PTFE and the nozzle can cause issues. It can be problematic. It causes melted plastic to pool. This pooling allows it to solidify.
- Dust, carbonized filament, or burned plastic inside the nozzle from sitting idle while hot.
🛠️ How to Fix It
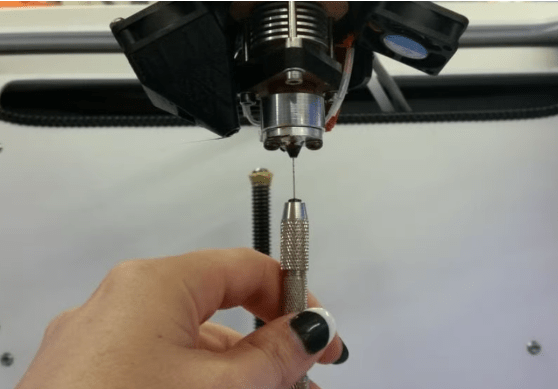
🔥 Cold Pull (a.k.a. Atomic Pull)
- Heat nozzle to printing temp (e.g. 200 °C for PLA).
- Push some filament manually to prime.
- Lower temp to ~90–100 °C (just below PLA soft point).
- Pull filament out sharply. It should come out with the clog attached.
- Repeat if necessary until it comes out clean.
🧪 Tip: use white or light-colored filament for better visual confirmation.
🔥 Needle or Cleaning Kit
- Use a nozzle cleaning needle (0.3–0.4 mm) while hot to dislodge clogs.
- Gently insert the needle, move in and out, and purge filament with extrusion commands.
🧽 Disassemble and Soak
- Remove nozzle and soak it in acetone (for ABS) or baking with heat (torch or heat gun) if using PLA/PETG.
- Use fine brass brushes or thin wire to clean out interior.
⚠️ Replacing the Nozzle: What to Watch Out For
If the nozzle is too clogged or damaged, replacement might be the best option—but you must be careful:
- Heat the nozzle before removing – Unscrewing cold may damage threads or crack the heat block.
- Hold the heater block with pliers – Always stabilize to avoid twisting the thermistor or wires.
- Install with a snug fit (not overtightened) – Use a torque wrench or light hand pressure once hot.
- Mind the PTFE tube: If it doesn’t sit flush against the nozzle, the melted filament can creep into the gap. The filament will cool down and form a solid plug inside the hotend. This is a classic trap for beginners.
🧠 Pro Tips from Experience
💡 “I once tried changing a nozzle cold and ended up stripping the thread inside the heat block. That forced me to change the entire hotend. Always heat it up to around 220 °C before doing anything.”
💡 “When I switched to a hardened nozzle for carbon fiber, I forgot to recheck the PTFE alignment. After two prints, the plastic ballooned inside the hotend and jammed everything.”
💡 “I keep a small cleaning needle next to the printer. After every 4–5 prints, I do a quick hot purge—saves me from major clogs down the road.”
🔧 Tools You Should Keep Nearby
- Nozzle cleaning kit (needles + brass brushes)
- Cold pull filament (e.g. nylon, clear PLA)
- Spare nozzles (0.4 mm brass + hardened backup)
- Heat-resistant pliers
- PTFE cutter or collet clip (to ensure flush placement)
📊 Summary Table
| Error | Visual Symptom | Main Cause | Solution |
|---|---|---|---|
| Layer Shifting | Misaligned layers | Loose belts, fast speed | Tighten belts, reduce speed |
| Warping | Corners lifted | Uneven cooling | Heated bed, use brim |
| Stringing | Plastic hairs | Retraction or temp | Adjust retraction/temp |
| Under-Extrusion | Gaps or weak walls | Clog, low flow | Clean nozzle, increase flow |
| Elephant’s Foot | Squished bottom | Z-offset, bed too hot | Adjust Z-offset, reduce temp |
| Blobs/Zits | Surface bumps | Retraction issues | Tune retraction settings |
| Layer Separation | Layers split apart | Low temp or drafts | Raise temp, enclose printer |
| Nozzle Clog | No extrusion | Debris or burnt filament | Clean or replace nozzle |
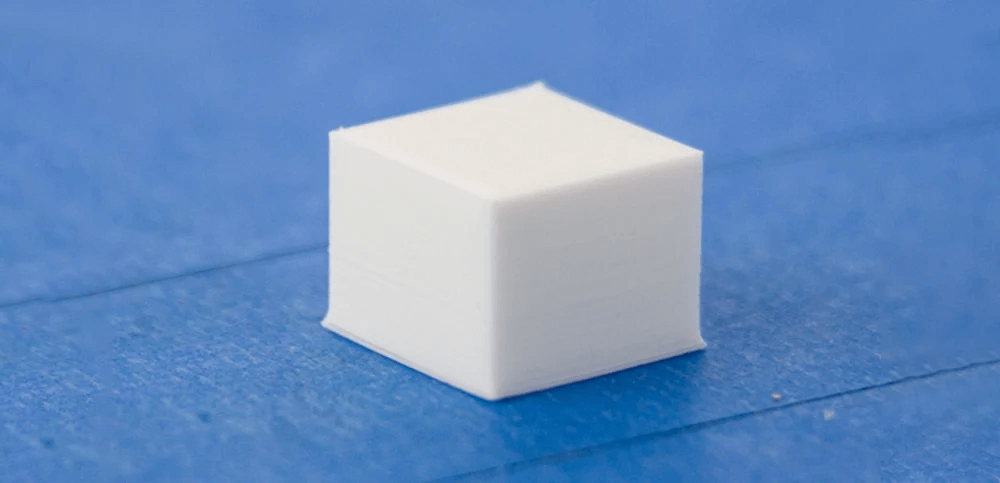
🚀 Bonus Tips for Prevention
- Print a calibration cube monthly to spot issues early.
- Store filament in airtight containers with desiccant.
- Always check first layer adhesion before leaving a print unattended.
- Update firmware and slicer to latest versions.
💬 FAQ
Why does my print stop extruding mid-way?
Check for a nozzle clog or that your filament hasn’t run out. Also check for heat creep or motor overheating.
How do I know if my nozzle is partially clogged?
Signs include inconsistent extrusion, thin lines, or clicking sounds from the extruder.
Can ambient temperature affect my prints?
Yes. Drafts, cold rooms, or placing the printer near windows can cause layer separation or warping.
Need a printable version? Want help calibrating your printer? Drop a comment or reach out — we love to help the maker community!

Leave a comment