When you first start tweaking slicer settings, it can feel overwhelming. There are endless sliders, cryptic acronyms, and tiny numbers. These elements can somehow make or break your print. But once you understand how each one affects your 3D printer, you unlock a new level of quality. Your 3D printer’s performance is significantly improved.
In this guide, we’ll look at important slicer settings every maker should know. We will talk about tools that can help you adjust them easily.
We’ll show how these settings commonly appear in Cura, PrusaSlicer, and OrcaSlicer, but the same rules apply to all slicers.
⚖️ 1. Bed Leveling & First Layer Adhesion — The Foundation of Every Successful Print
Key Settings: First Layer Height, Z Offset, Flow Rate, Bed Temperature
The first layer determines everything.
No slicer setting or calibration will matter if your printer isn’t leveled correctly. Your first layer must adhere to the build plate. Here’s a full breakdown of what influences bed leveling and adhesion — from hardware setup to slicer configuration.
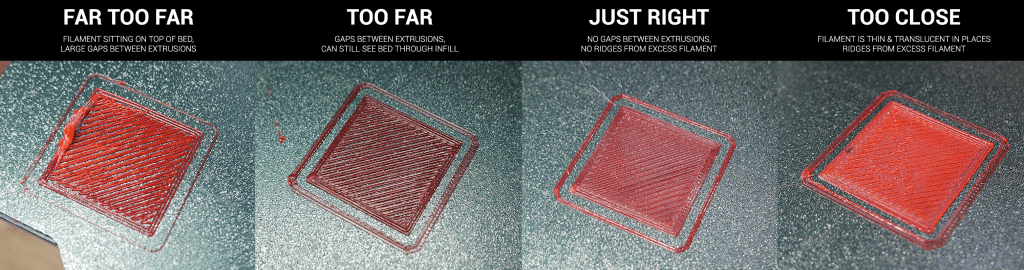
Cura Example: Adjust your First Layer Height to 0.24 mm for better bed contact.
OrcaSlicer Equivalent: “First Layer Flow Ratio” – set between 105–110% for stronger adhesion.
Hardware-Level Factors
Before diving into slicer settings, the mechanical foundation must be right.
1.1. Bed Leveling Method
- Manual leveling: Adjust the bed screws while moving the nozzle to the corners.
→ Pro tip: Use feeler gauges or calibration cards for consistent spacing.
👉 Feeler Gauge Set — check price on Amazon
- Fully automatic leveling (ABL): Systems like BLTouch, CR-Touch, or inductive sensors create a mesh map of the bed.
→ If your printer supports firmware mesh leveling (Marlin/ Klipper), slicers can use this automatically.
👉 See on Amazon: BLTouch Auto Bed Leveling Sensor
1.2. Build Surface Material
Different build plates react differently to temperature and adhesion:
- Glass → Smooth surface, easy removal, but need adhesives for PLA/ABS.
- PEI sheets → Excellent grip when warm; self-releasing when cool.
- Textured flex plates → Hide small imperfections in the first layer.
👉 Check on Amazon: PEI Spring Steel Build Plate
1.3. Temperature Control
- Bed temperature stability is essential.
- Uneven heating can cause warping or detachment at the edges.
Use a surface thermometer to verify uniform heat distribution.
👉 See IR Thermometers on Amazon
🧠 Slicer-Level Settings
Once the printer’s mechanically sound, slicer settings dictate how the first layer behaves.
2.1. Layer Height (First Layer)
A thicker first layer helps adhesion.
- Cura: “Initial Layer Height” (default: 0.2–0.3 mm)
- PrusaSlicer / Orca: “First Layer Height” (default: 0.2 mm or 120% of layer height)
- Simplify3D: “First Layer Height (%)”
🔧 Tip: A slightly higher layer height compensates for minor leveling errors.
2.2. First Layer Speed
Printing too fast can drag filament; too slow can overextrude.
- Cura: “Initial Layer Speed” (15–25 mm/s ideal)
- Prusa/Orca: “First Layer Speed” (set separately for perimeters and infill)
- Simplify3D: “First Layer Speed (%)”
👉 Quieter and more precise printing can be achieved with two options. You can use high-quality stepper dampers or opt for silent fans — [see on Amazon].
2.3. Bed & Nozzle Temperature
Adhesion is thermal-dependent:
- PLA: 60 °C bed / 200 °C nozzle
- PETG: 75–85 °C bed / 240 °C nozzle
- ABS: 100 °C bed / 250 °C nozzle (enclosure recommended)
Slicers differ in control precision:
- Cura allows “Initial Layer Temperature” separate from others.
- Prusa/Orca allow variable temperature by layer range.
- Simplify3D uses process-based profiles for total control.
🧴 Optional: Glue sticks, 3D printing adhesives like Magigoo, or hairspray with PVP formula — all help prevent warping.
2.4. First LAYER Flow / Extrusion Multiplier
Fine-tuning the amount of material extruded on the first layer:
- Cura: “Initial Layer Flow (%)”
- Orca/Prusa: “First Layer Extrusion Width” (in mm or %)
- Simplify3D: “First Layer Width (%)”
Try 105–120 % for better bed adhesion on larger surfaces.
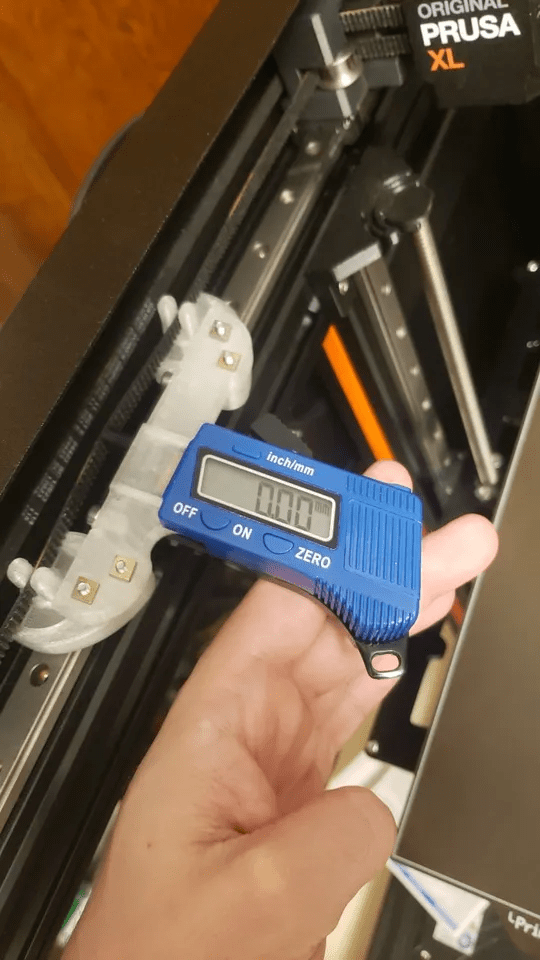
👉 a digital caliper or micrometer helps verify the actual line width — [check on Amazon].
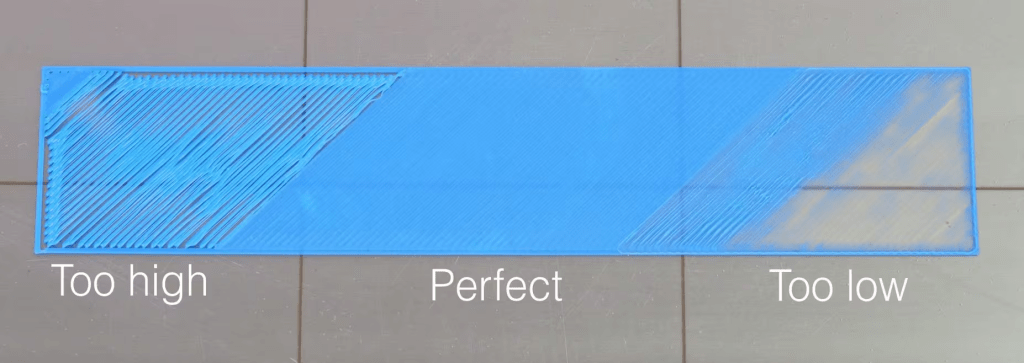
2.5. Z-Offset / Baby Stepping
Adjusts nozzle distance from the bed — the single most important factor for adhesion.
- Cura: controlled via printer firmware (not slicer-side).
- Prusa/Orca: can save Z-offset per filament.
- Klipper: supports live “baby stepping” during the print for fine tuning.
🧰 Tools like dial gauges or bed mesh visualizers can help quantify your offset more precisely.
👉 See digital dial gauges on Amazon
2.6. Skirts, Brims, and Rafts
These settings stabilize adhesion and prime the nozzle.
- Skirt: tests extrusion before touching the model.
- Brim: adds adhesion area around the base.
- Raft: adds a thick sacrificial layer under the print (best for ABS).
👉 pack of removable adhesive build sheets (textured PEI or tape).
2.7. Retraction and Wipe Behavior (First Layer)
Some slicers allow disabling retraction on the first layer to keep continuous extrusion:
- Cura: “Retraction Minimum Layer”
- Orca: toggle Retraction on First Layer
- Simplify3D: similar under Extruder tab
Disabling it helps prevent filament gaps at the start.
2.8. Cooling (Fan Settings)
- Keep the part cooling fan off during the first layers for better adhesion.
- Cura: “Initial Fan Speed”
- Prusa/Orca: “Disable fan for first X layers”
- Simplify3D: layer-based fan overrides
🧩 Advanced Features
3.1. Bed Mesh Compensation
If your firmware supports mesh leveling, slicers can visualize it:
- OrcaSlicer: Bed Mesh Preview tab.
- PrusaSlicer: integrates with firmware mesh from the printer.
- Cura: visualization only through plugins (e.g., “Mesh Tools”).
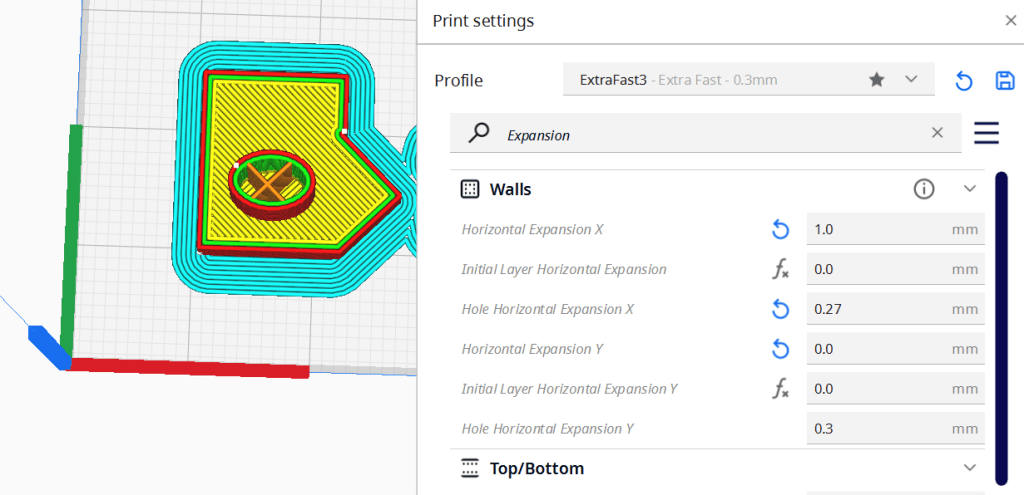
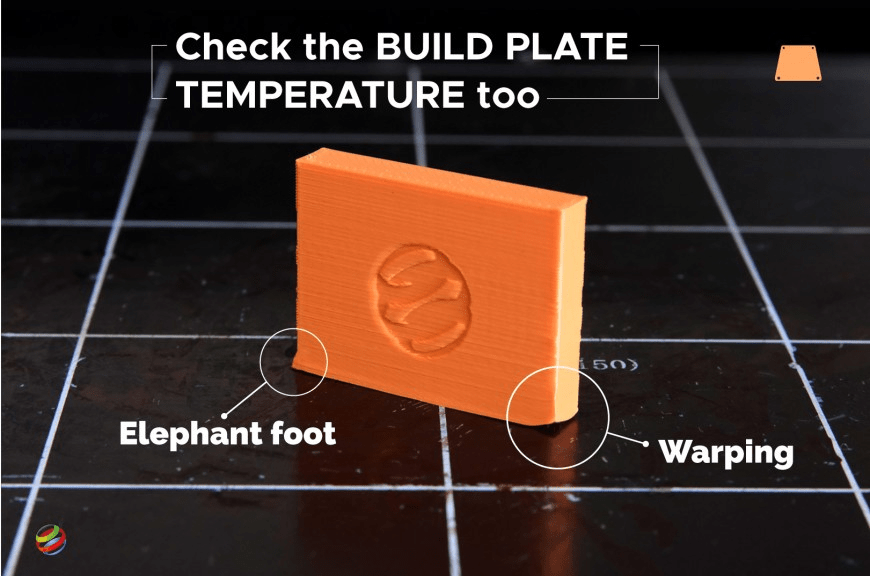
3.2. Elephant Foot Compensation
Compensates for the slightly squished bottom edges.
- Cura: “Initial Layer Horizontal Expansion”
- Prusa/Orca: “Elephant Foot Compensation”
- Simplify3D: “Horizontal Size Compensation”

✅ Practical Workflow Summary
- Level your bed using a gauge or auto-sensor.
- Clean surface (IPA or isopropyl alcohol wipes).
- Apply adhesive (glue stick, Magigoo, or PVP hairspray).
- Set:
- 0.2–0.3 mm first layer height
- 110–120 % first layer width
- 15–25 mm/s speed
- 105 % flow
- 0% fan
- Watch the first layer. Pause and baby-step Z if needed.
Tools that help:
- Feeler gauge set (0.02–1mm) – perfect for manual leveling precision.
- Glass or PEI build plates – ultra-flat, reliable adhesion.
- Auto-bed leveling sensors (BLTouch / CR Touch).
- Magigoo adhesive or glue stick for trickier materials.
👉 Recommended tools I personally use:
Feeler Gauge Set — check price on Amazon
PEI Build Surface for Ender 3 — see on Amazon
Magigoo Original Adhesive — check on Amazon
🎯 2. Dimensional Accuracy & Calibration — Printing What You Actually Designed
Even if your first layer sticks perfectly, your print can still be off by a few tenths of a millimeter. This small deviation is often enough to make mechanical parts not fit together. Dimensional accuracy is the difference between “it looks good” and “it works perfectly.”
Here’s how slicer settings, firmware features, and hardware tools all contribute to getting precise, dimensionally exact prints.
🧰 Hardware-Level Influences
Before we talk slicer settings, let’s cover what physically affects your printer’s dimensional output.
2.1. Steps per Millimeter Calibration
Every axis — X, Y, Z, and the extruder — depends on exact steps/mm configuration in firmware.
- If your prints are slightly too large or small, your steps/mm are off.
- You can test this by printing a 20x20x20 mm calibration cube and measuring it.
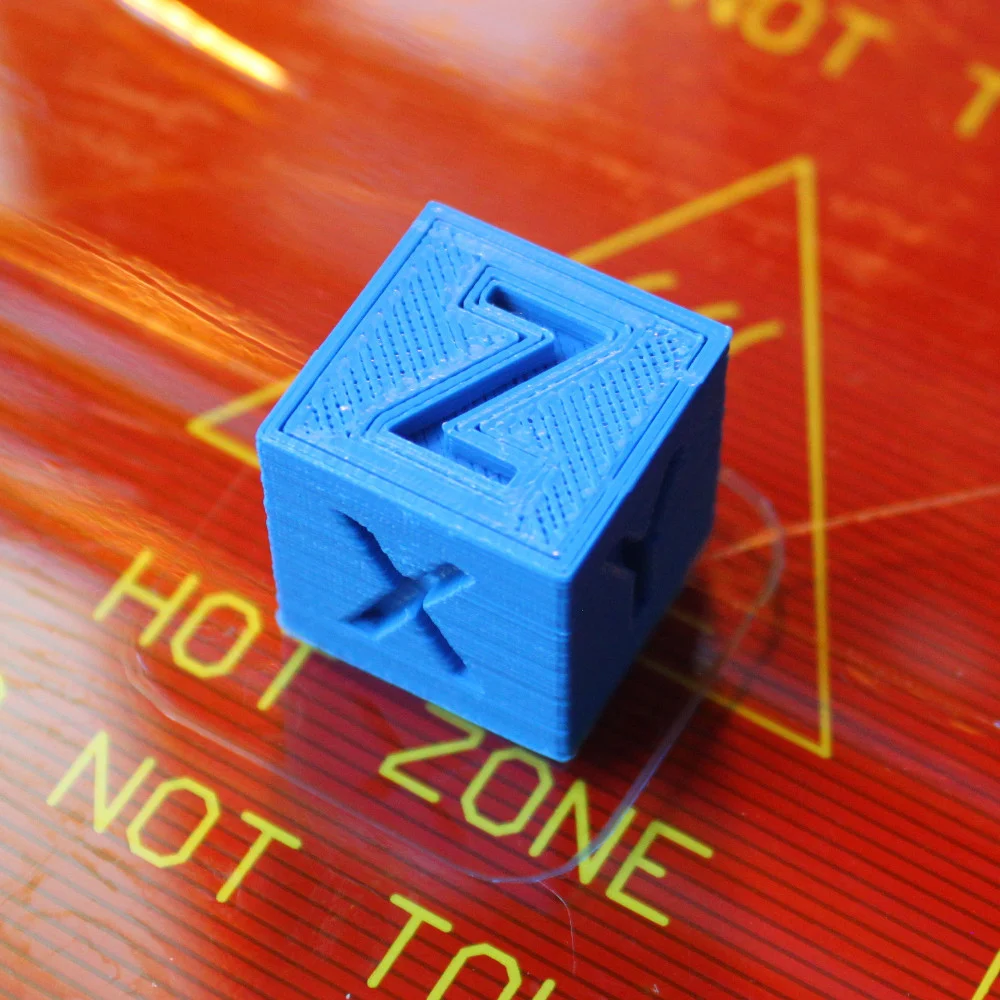
👉 A digital caliper or micrometer is essential for this.
→ Check on Amazon: Digital Vernier Caliper
2.2. Belt Tension and Pulley Condition
Loose or uneven tension on your belts causes scaling errors and ghosting.
- Make sure all belts have uniform, moderate tension.
- Use belt tension gauges or printable tension meters for consistency.
👉 See on Amazon: GT2 Belt Tension Meter
2.3. Extruder Mechanics
Inconsistent extrusion directly impacts wall thickness and fit tolerance.
- Check for gear wear, filament slippage, or incorrect E-steps calibration.
- Use a filament scale test: mark 120 mm, extrude 100 mm, and measure leftover.
👉 Tool-tip: Filament guides and extruder calibration tools improve repeatability.
🧠 Slicer-Level Calibration Settings
2.4 Extrusion Multiplier / Flow Rate
This setting directly controls how much plastic is pushed through the nozzle.
- Cura: “Flow (%)” — separate per object or material.
- PrusaSlicer / OrcaSlicer: “Extrusion Multiplier.”
- Simplify3D: “Extrusion Multiplier” under “Other” tab.
🧩 Tip: Print single-wall calibration cubes or thin-walled tubes and measure their thickness. Adjust flow until the measured wall matches your slicer’s “extrusion width.”
👉 Tool-tip: precision digital micrometers — perfect for verifying wall thicknesses.
2.5 Horizontal Expansion / XY Compensation
A game-changing slicer feature for improving part fit.
Compensates for material squish and nozzle pressure that make holes smaller and parts slightly oversized.
- Cura: “Horizontal Expansion.”
- PrusaSlicer / Orca: “XY Size Compensation.”
- Simplify3D: “Horizontal Size Compensation.”
Typical values:
• For tight-fitting holes: −0.05 mm to −0.1 mm
• For undersized parts: +0.05 mm
👉 Affiliate tie-in: Gauge pin sets or drill bit measurement kits are great for testing tolerances.
2.6 Compensation by Wall Count and Order
Sometimes slicers focus on inner or outer walls first, changing how dimensions are interpreted.
- Cura: “Wall Ordering” — try Outside to Inside for dimension-critical prints.
- Prusa/Orca: “External Perimeters First.”
- Simplify3D: “Outline Direction” → choose Outside-In for accuracy.
External-first walls keep the true outer dimensions, especially on mechanical parts.
2.7 Adaptive Layer Height
While not directly dimensional, adaptive layers can influence vertical accuracy.
If the slicer changes layer height dynamically, rounding errors on Z-axis dimensions.
- Keep this disabled for mechanical parts or precision jigs.
2.8 Shell Overlap and Infill Overlap
Controls how much infill connects to the perimeter walls. Too high overlap can push perimeters outward.
- Cura: “Infill Overlap (%)”
- Prusa/Orca: “Infill/Perimeter Overlap.”
- Simplify3D: “Outline Overlap (%)”
Try 10–15% for accuracy; more can cause bulging on thin walls.
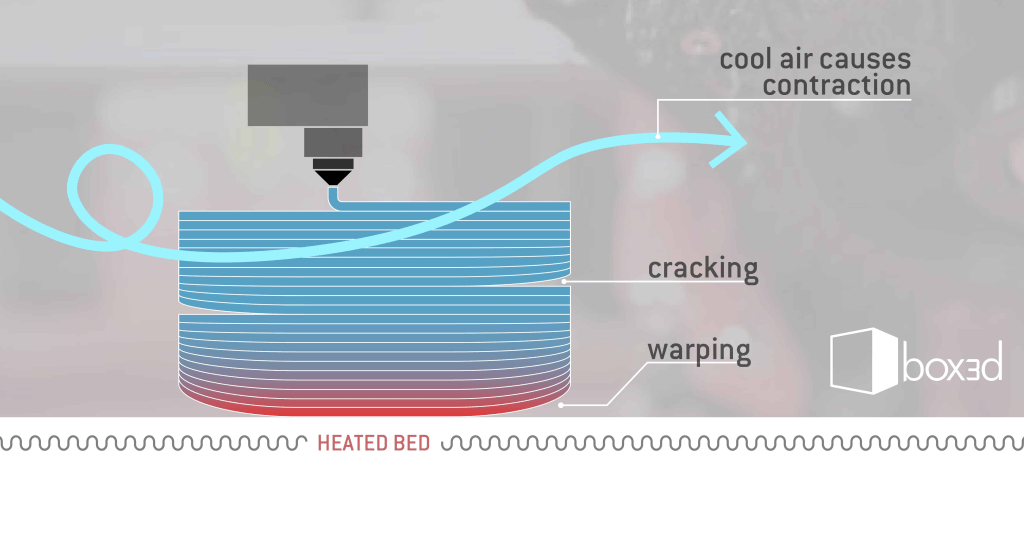
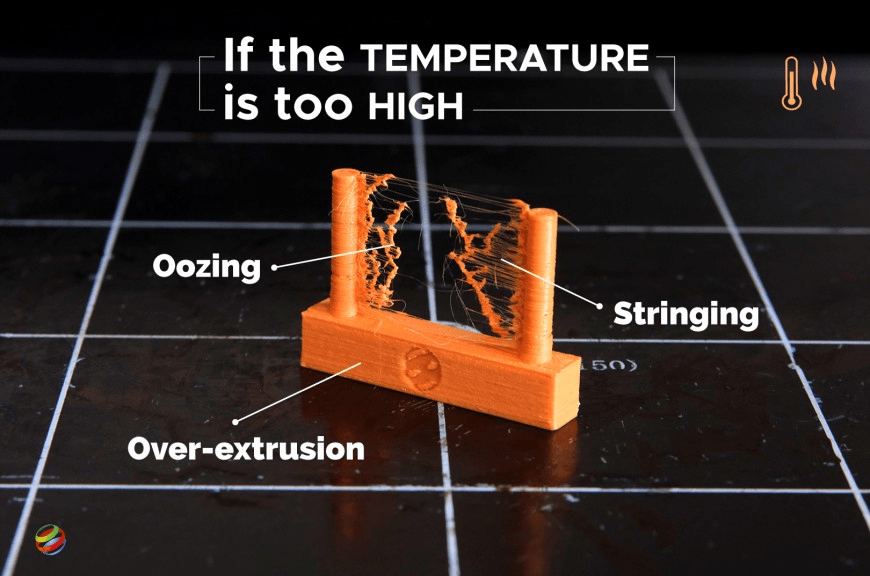
🧮 Temperature & Cooling Effects
Temperature affects dimensional stability, especially for materials like ABS or Nylon.
- Too hot: parts expand and warp as they cool.
- Too cold: poor layer bonding, fragile prints.
👉 Affiliate link idea: Infrared thermometer or thermal camera for checking actual nozzle/bed temps.
Bonus: Use a fully enclosed build chamber for ABS or ASA to prevent shrinkage variation.
🧩 Firmware & Advanced Features
2.9 Linear Advance / Pressure Advance
This compensates for extrusion pressure delay during acceleration/deceleration.
- Marlin: “Linear Advance K-factor.”
- Klipper: “Pressure Advance.”
- Input Shaping Add-on: Reduces vibration that affects corner accuracy.
→ Works with accelerometer modules like the ADXL345.
👉 See on Amazon: ADXL345 accelerometer module for Klipper input shaping.
Properly tuned advance dramatically improves corner sharpness and eliminates bulging.
🧠 Tutorial: What Is and How to Tune Pressure Advance / Linear Advance
1) What it does
Pressure Advance compensates for the delay between extrusion pressure buildup and release inside the hotend during acceleration and deceleration.
Goal: cleaner corners, smoother starts/stops, reduced blobs or gaps in extrusion.
- Without PA: you’ll see bulging corners or blobs after direction changes.
- With PA tuned: extrusion starts/stops precisely where it should.
2) What you need first
Before calibrating PA:
- Calibrate your e-steps and flow rate.
- Use a clean nozzle and consistent filament.
- Ensure belts and mechanics are tight.
- Prepare a simple calibration model — e.g., a single-wall cube or a “pressure advance test tower.”
3) Typical value ranges
| Firmware | Command | Typical range |
|---|---|---|
| Klipper | SET_PRESSURE_ADVANCE ADVANCE=... | 0.00 → 0.10 |
| Marlin | M900 K... | 0.00 → 0.30 |
Start low and move up gradually — higher values compensate more aggressively.
4) Step-by-step calibration
A. Prepare
- Calibrate extrusion (E-steps and flow).
- Load your calibration model (simple wall or tower).
- Print once with PA = 0 and observe: you’ll likely see corner blobs or over-extrusion after deceleration.
B. Incremental tests
- Increase PA slightly:
- Klipper:
SET_PRESSURE_ADVANCE ADVANCE=0.02 - Marlin:
M900 K0.02(thenM500to save)
- Klipper:
- Reprint the same model.
- Keep increasing in small steps (0.02 → 0.04 → 0.06 …).
- Watch the corners: blobs should shrink and lines become more consistent.
C. Find the sweet spot
- If you see blobs — increase PA slightly.
- If you see gaps or under-extrusion at line starts — your PA is too high, lower it a bit.
- The correct value is the lowest that fully removes the corner blobs without causing gaps.
5) Fine-tuning tips
- Speed matters: test at the same speed you normally print.
- Material-specific: different filaments need slightly different PA.
- Keep flow consistent: don’t mix flow changes with PA testing.
- Save your result:
- Marlin →
M500 - Klipper → save in
printer.cfg
- Marlin →
- Combine with Input Shaper (Klipper):
PA = fixes extrusion lag,
IS = fixes mechanical vibration.
Together → ultra-clean corners.
6) Common mistakes
❌ Calibrating PA before e-steps/flow → unreliable results
✅ Always calibrate extrusion first
❌ Testing at 40 mm/s but printing at 100 mm/s → overcompensation later
✅ Calibrate at real print speeds
7) Quick summary checklist
- Calibrate e-steps & flow
- Print single-wall test
- Increment PA (0.00 → 0.10 Klipper / 0.00 → 0.30 Marlin)
- Watch corners: blobs = increase, gaps = decrease
- Save final value
2.9.1 Stepper Current & Microstepping
Fine current tuning reduces missed steps and improves repeatability.
- Overdriven steppers cause vibration → undersized prints.
- Undervoltage steppers skip steps → oversized or skewed prints.
👉 Affiliate angle: Multimeter sets or oscilloscopes for tuning advanced users.
✅ Quick Reference — Ideal Dimensional Accuracy Settings
| Setting | Ideal Range | Common Slicers |
|---|---|---|
| Flow / Extrusion Multiplier | 95–105% | Cura, Prusa, Orca, S3D |
| XY Compensation | −0.05 to +0.1 mm | Cura, Prusa, Orca |
| Line Width | 0.42 mm (for 0.4 nozzle) | All |
| Infill Overlap | 10–15% | All |
| Wall Order | Outside-In | All |
| Z-Layer Rounding | Disable adaptive | All |
🧠 Pro Tip
If you want perfect mechanical fit, design with tolerance in mind:
- For press-fit parts: allow 0.15–0.25 mm clearance.
- For sliding fits: 0.3–0.4 mm clearance.
- For tight screw fits: undersize holes by 0.2 mm, then tap threads manually.
🧱 4. Support Settings & Overhang Improvement
Supports are one of the trickiest parts of FDM printing — they can make or break a print. Getting the right balance between stability, ease of removal, and surface finish is key.
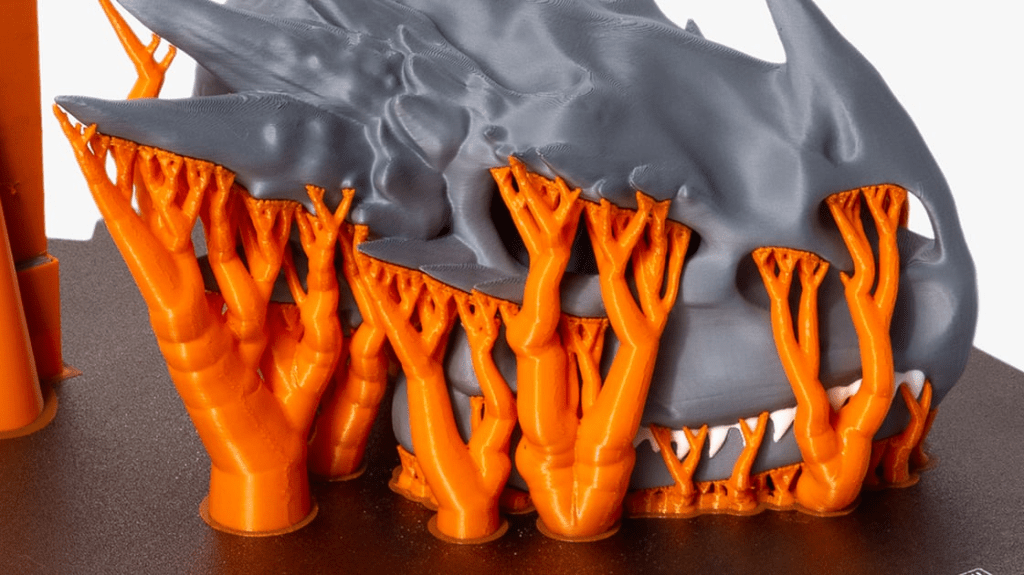
Every slicer handles support structures differently. Cura offers tree and organic supports. OrcaSlicer and PrusaSlicer give advanced control over interface layers and density. Bambu Studio adds adaptive branch supports that automatically improve shape and strength.
Small adjustments in support density, Z distance, and interface thickness can drastically affect the final print quality and cleanup time.
If you want a deep dive into how supports work, how to set them for both FDM and resin printing, and how to safely remove them without damaging your model — check out our full guide here:
👉 Full Guide to Supports in FDM and Resin 3D Printing
Key Settings: Support Density, Z Distance, Interface Layers, Tree Supports
Supports are necessary evil — too dense and they scar the model, too sparse and your print collapses.
Cura Example: Tree supports with 12% density.
OrcaSlicer Equivalent: Organic supports with “Branch Density” 0.3–0.5.
Tools that help:
- Deburring tool or flush cutters for removing supports.
- Precision tweezers for small details.
- Fine sandpaper (800–2000 grit) for surface finishing.
- For resin users: UV pen light for spot curing.
👉 My essential tools for support cleanup:
Deburring Tool for 3D Prints — see on Amazon
Sandpaper Set 2000 Grit — see on Amazon
🎨 5. Surface Finish & Aesthetic Tuning
Once your printer is set up, the next important step is improving surface quality. You need to remove layer lines, bumps, blobs, and rough spots. These issues make your prints look “3D printed.”
This is where slicer settings become important. The correct mix of layer height, line width, and temperature can significantly influence your model’s appearance. Additionally, the flow rate impacts how the model feels.
🧠 Key Settings That Affect Surface Quality
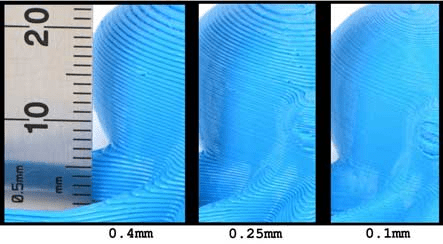
- Layer Height & Line Width:
Lower layer heights (like 0.12 mm or 0.08 mm) produce smoother surfaces but increase print time. For detailed miniatures or figurines, use thinner layers; for prototypes or mechanical parts, stick to 0.2–0.28 mm.
Adjusting line width slightly wider than the nozzle diameter (e.g., 0.45 mm for a 0.4 mm nozzle) can help close small gaps and improve top-layer smoothness.
- Print Speed & Acceleration:
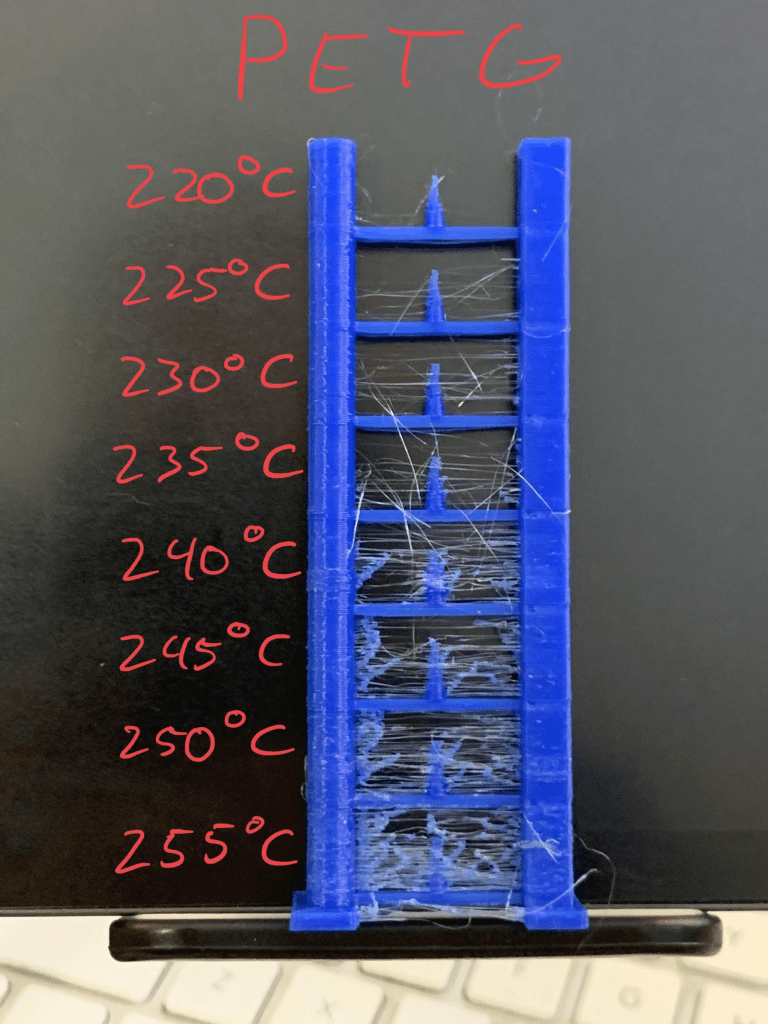
Fast printing often leaves visible vibration marks or ghosting. Slowing down the outer wall speed to 25–35 mm/s helps achieve clean lines. Reducing acceleration also contributes to uniform lines, especially on visible faces. - Temperature Tuning:
Every filament brand behaves differently. Printing too hot leads to glossy over-extrusion lines and stringing; too cold results in matte but weak bonding. Do a temperature tower test for each new spool.
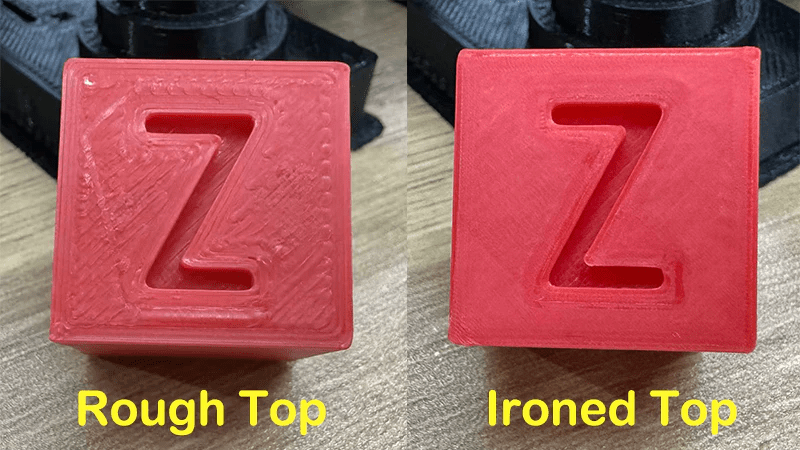
- Ironing (Top Surface Smoothing):
Many slicers (Cura, Orca, Bambu Studio) include “ironing” or “surface smoothing.” This feature re-melts and flattens the top layer. It does so by moving the nozzle over it again at low flow. This method is excellent for flat parts or enclosures.
- Coasting & Wiping:
These settings reduce pressure before travel moves to prevent blobs. Cura, Orca, and PrusaSlicer each implement them slightly differently. Yet, the goal is the same. The aim is to achieve clean edges with no nozzle ooze.
- Vase Mode (Spiralize Outer Contour):
Perfect for aesthetic models and vases. The slicer continuously prints the outer wall in one spiral motion, removing seams entirely. Ideal for showing off translucent or glossy filaments.

⚙️ Hardware and Material Factors
Even the best slicer settings can’t fix poor mechanical setup. Vibrations, loose belts, or misaligned Z screws can cause banding. Make sure to:
- Check your Z-axis lead screws for wobble.
- Level the bed carefully (manual or with ABL).
- Use rigid mounts or dampers to reduce vibrations.
Also, the choice of material has a huge impact:
- Silk PLA gives smooth glossy finishes but exaggerates flaws.
- Matte PLA hides layer lines effectively.
- ABS or ASA can be vapor-smoothed for a glossy finish (with care).
Resin prints can be sanded and polished to optical clarity — check our dedicated Resin Post-Processing Guide for detailed steps.
🛠️ Tools for Surface Refinement
Here’s a quick toolkit that helps bring your finish to the next level:
- Precision Sanding Set – various grits from 400 to 3000 for polishing layer lines.
- Mini Rotary Tool (Dremel style) – great for smoothing edges and fine engraving.
- Isopropyl Alcohol & Microfiber Cloths – essential for post-cleaning and surface prep.
- Heat Gun or Small Torch – used to slightly reflow PLA or remove stringing.
🪞Bonus: Texture and Finish Effects
Some slicers allow surface patterning. They offer features like adding a fuzzy skin (Cura’s “Fuzzy Skin”) or applying subtle textures. These techniques help disguise layer lines.
You can also enhance surface feel with:
Oil polishing (WD-40 or mineral oil) can darken PLA. It reduces white sanding marks. This is a pro trick used by many makers.
Primer + paint for model-making or cosplay.
⚠️ Common Mistakes Beginners Make
- Ignoring calibration prints: Every slicer tweak needs measurable feedback.
- Changing multiple variables at once: Tune one setting at a time.
- Skipping maintenance: Dirty nozzles and loose belts will sabotage even the best settings.
- Underestimating temperature effects: Ambient room temp can change everything.
💬 Conclusion
Understanding your slicer is what separates “functional prints” from “flawless results.”
Start experimenting with these key settings. Use the right tools. You’ll see an immediate jump in both print quality and consistency.
👉 Have a favorite slicer tweak or calibration tool?
Share it in the comments — I’d love to hear what’s working for you!
Affiliate Disclaimer
Some links in this article are affiliate links. This means I may earn a small commission if you buy through them — at no extra cost to you. I only recommend products I’ve personally tested and trust for my own printing setup.

Leave a comment